

Greetings all,
PythNutD here with a step-by-step tutorial showing how I painted my first batch of Robotech RPG Tactics minis. For my first Veritech Squadron I decided to paint Vermilion Squadron, with Rick Hunter's VF-1J first.
Now this is an intermediate level paint job with 3-4 layers of paint for most of the colors. I don't plan on painting my whole RRT collection at this level, or I will be painting all year, so future articles will show both faster/simpler paint jobs and possible more advanced painting.
Now Enjoy.....
Now I would like to point out that I use GW paints because I have used them for a long period of time, and am used to them, my method can be copied with any mini paint product out there. I have a mix of the new and slightly older paints on my desk so I will be designating the paints I use, however for some of the older GW paints they paints I will list may have been replaced by new paints with the same color, but different name. It is important to note that during this process i frequently added water to my paints and washed and wet my brush to make sure that the paint didn't get clumpy and continued to flow smoothly.
There are two styles to layering paints and I tend to use a blend of both depending on the look I am looking for.
Smooth Blend : When painting layers with paints you need to paint several layers with the same color to get a smooth blend, especially when using light colors. When putting down the layer of a color in this method I will paint the surface with the color and then add layers on top of the first with each layer set back slightly from first to create a smooth gradient blend from dark to light across the surface. The goal of painting this way is to get a smooth blend from the darker under coat to the edge that you want to be lighter.
Banded Highlights: Alternately you can paint layers in a more cartoon style. In this method the layers are painted in bands so you see a solid color with a dark edge and light edge.
1) Basecoat:
I started of with black primer, using a GW product. Of course I made sure to keep my flying bas separate so I wouldn't paint right over the clear acrylic. I decided to base my minis later, as I haven't decided what theme I will use for each army yet. Otherwise I would attach the base and base it at the same time.

2) Red stripes, lights, and lenses:
I always start my red with either a layer of Red Gore or Scab Red depending on how dark I want the shadow edges to be, in this case I used Red Gore

Next I layer on Blood Red. The stripes receive Red over the entire stripe, in this case the the previous layer could be replaced by a second coat of Blood Red, but I find the darker shade under helps for a slight color shift in the surface, mimicking light shift across a surface to a small degree.
For lenses and lights I paint using the gem method: Paint almost the whole surface with the dark shade, then the next layer is painted on as a arc on the left and top of the lenses (for a square surface it is less an ark and more a stripe), the last layer is painted as a thinner ark over the first. As a added effect you can put a lens flare using white, simply put a small dot of paint on the dark side of the lens to look like a light reflecting on a smooth surface. Sometimes I put a color wash or varnish on the surface to get a shine and make the colors blend.

It's hard to make out in the picture but I did edging on the wing tips with blazing orange, and put a final highlight on the lenses.

3) Green Lens:
For the helmet lens I painted first with Warpstone Glow, then using the gem method I put a layer of Warboss Green, followed by a layer of Moot Green.
4) Blue Pilot canopy and Lights:
I started with a base coat of Macragge Blue.

Next I painted the light on the knee with a band of Calgar Blue (gem method) and put a coat over the entire canopy. The previous shade on the canopy allows the lighter blue to be applied once and still have some slight darker blue showing for a varied color on the surface.

The next shade of Hoeth Blue is painted on the front and back edge of the canopy and along the center of the canopy. The Light receives a similar band as the previous.

The final highlight with Blue Horror is painted as a thinner band over the previous.

5) Yellow lights at Guardian Shoulder:
I used a base of Yriel Yellow with highlight of Flash Gitz Yellow.
6) Black and Grey:
If you watch anime and cartoons you may have noticed that the surfaces that are black usually have a lighter band on them to show edges of surfaces or reflection on the surface. When I paint "Black" I use greys on black surfaces to create this cartoon effect.
For the Gun and feet I started with bands of dark grey. In this case I used Codex Grey mixed 50/50 with Chaos Black. I painted a band around the edges of flat surfaces, around the ends of curved surfaces, and then I look at how light hits the surfaces and where I see an edge or band is visually lighter I paint along that area to create a static light effect.

Next I painted with unmixed Codex Grey to create a layer slightly smaller than the previous.

Next I painted using Fortress Grey as a smaller band over the previous layer. I painted the missiles with this color as well, and the edge around the head lens. Where two surface hit each other I usually try to keep a band of the black base showing

For the last highlight I edged with Ulthuan Grey. (Edging is when you paint just the edges of surfaces, and in this case the light reflection on a surface.)

Next I used a slightly watered down wash of Nuln Oil on all the grey and black surfaces, but not the lens at the head. The wash helps blend the layers together and create a uniform matte finish.

7) Next it was time for the "white" of the body.
White is one of the harder colors to paint on minis. It tends to not coat well and usually takes multiple layers to not have the base show through, and then can end up not being smooth. Minis that are mostly white are usually better of with a white primer, unless you want good dark shadows lines as you can see in this model. Thus When I want "white" areas but still have the dark edges I use light greys for the white.
In order to get a smooth finish I started with a base layer of Celestra Grey, making sure to keep edges and grooves showing black.

Next I paint on a layer of Ulthuan Grey. where the leg wings and in a few locations I left the previous layer exposed to create a shadow along the surface.

Finally I edge with White Scar.
8) Decals:
First thing with decals is to identify and cut out the pieces to be used.

I use a combo of Micro Set and Micro Sol to help melt the decal onto the model surface. You place a dab of the Micro Set on the location the Decal will be placed. I use water as usual to separate the decal form the sheet place it on the Micro Set on the model. Once the decals are mostly dry I place a little Micro Sol over each decal.

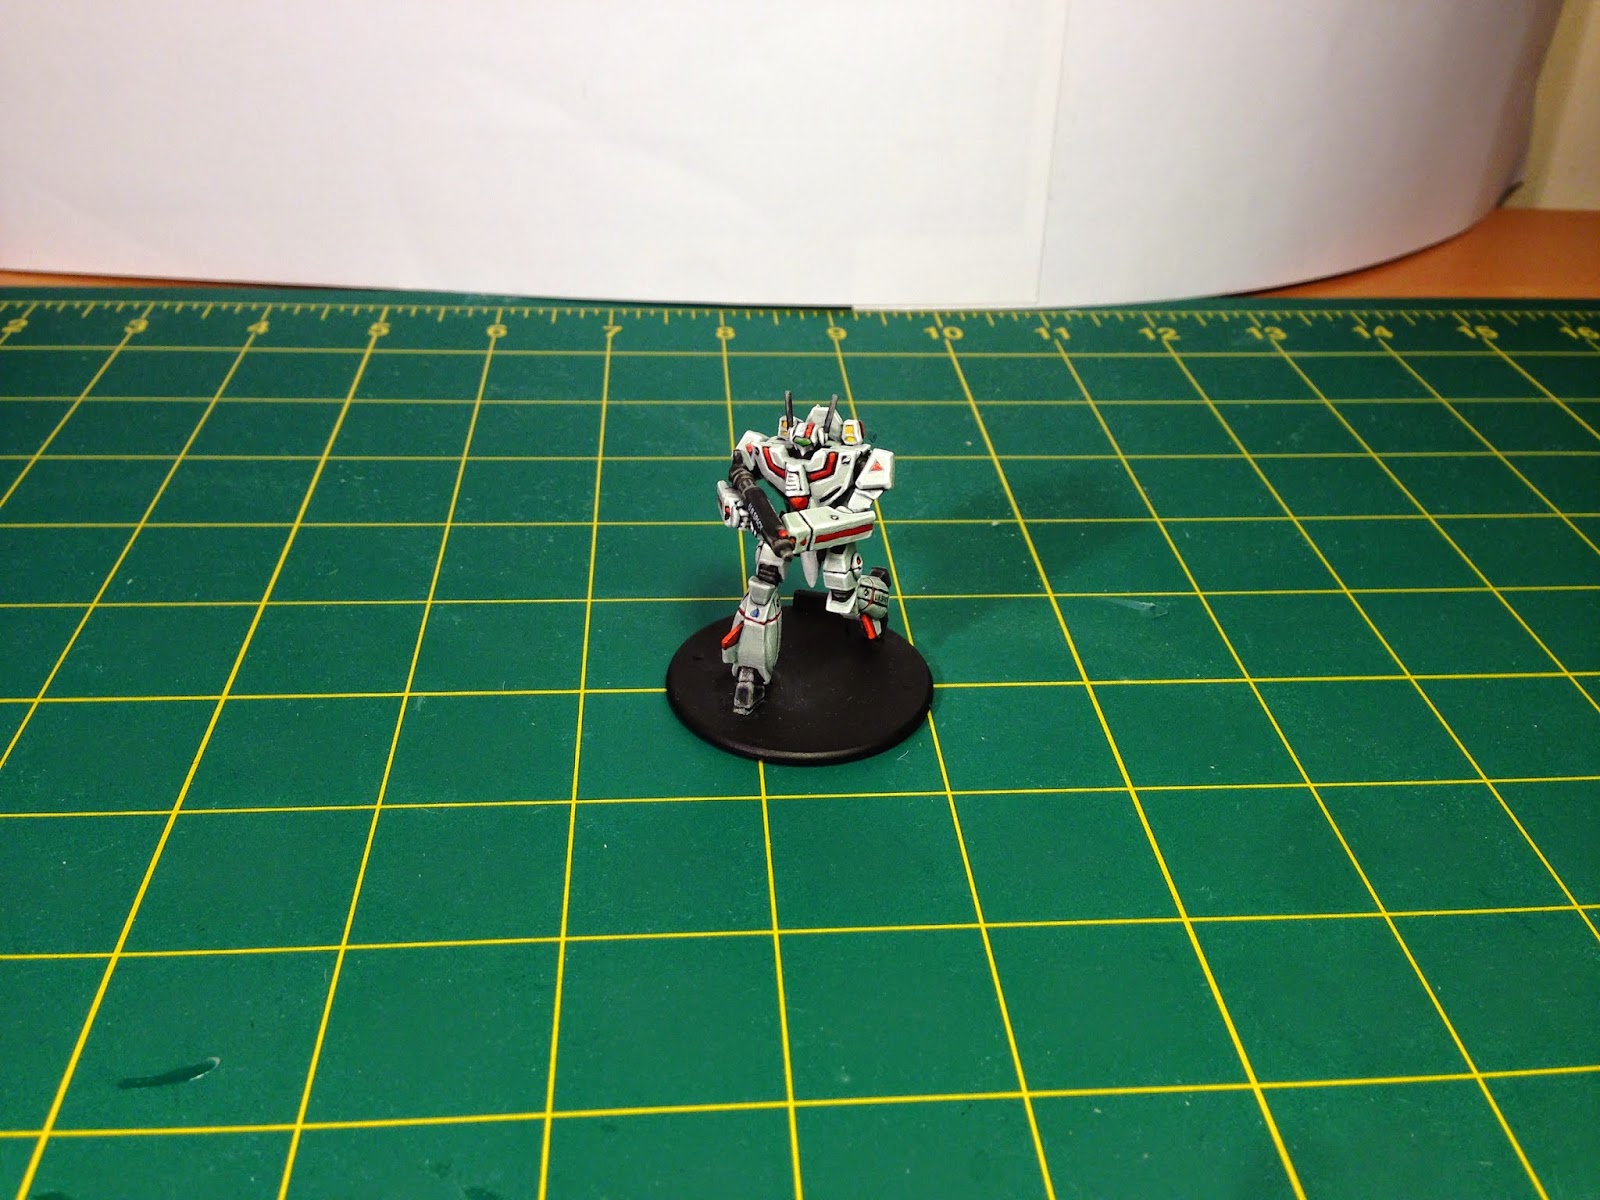
Here are a few Pictures of the finished model. I will have an article in the future going over basing methods.


Thanks again,
PythNutD
They look real nice. How did you make the seams dissapear? Will you be reviewing the rules?
ReplyDeleteI used plastic cement so th edges melt together and then used an exacto to scrape the extra glue and plastic and yo smooth thE surface.
DeleteI will most likely doing a rules review in the next week, couled with a demo game battle report
Where did you get the flight stands? I haven't found any I like yet but those look like they might be it. Thank you!
ReplyDeleteReally nice. You really helped us a lot with our RRT project here. There's some things that you did not instruct us, but we managed all the same to find out from your instruction. (The spartan and Repair drones can't be found anywhere...)
ReplyDeleteThough I'm wondering... Kinda tired to go back and get some more paints for miniature. I would love to finish my Valkyries with what I already have. Here you instruct us to use a mix of chaos black for the first part of the black...
But I see for the Roy Foker one you used Eshin Grey.
Would it be too light to use Eshin grey here too?
Never mind just passed the last few hours to read about painting black, the apparition of Eshin Grey and the unsuccessful replacement of Codex by Abbadon black for mixing paints.
DeleteIn short, with only the new citadel paint, better use Eshin and more Nuln Oil.